
Chimney Configurations
Please do not base your installation plans solely on the material found on this page. The diagrams may contain technical inaccuracies made for the sake of a better visual presentation. The diagrams are not to scale and do not account for all possible installation scenarios as well as the requirements of each specific stove. This page is meant for educational purposes only and not as definitive installation instructions.
The basic idea is that you can use single wall black stove pipe for interior components and double wall insulated pipe for all components that are outdoor, pass through the wall or ceiling, attic, or are close to combustibles. Typical clearance for single wall pipes is 18" and for double wall pipe it's 1-2" but please check the specs for your pipe. The 4" chimney is not UL or CSA listed (to the best of our knowledge they do not certify wood stove chimney under 5"). The single wall items are a lot cheaper and they also get hot and emit heat back into the room, so where possible it makes sense to use them (indoor only). All wood stoves are designed to connect to single wall pipes but virtually all installations require a combination of both single and double wall components with a special adaptor that joins them. If you would like to connect a double wall pipe directly to the stove you would first need to connect a single to double adaptor to the stove. There are 4 basic ways to install a wood stove:
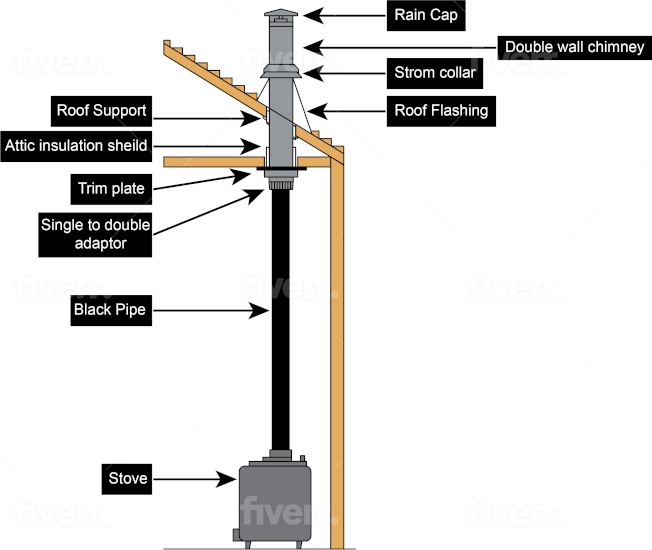
1) Connecting to the flue outlet on the top of the stove and going through the roof. From the stove up you will need the following items:
single pipe - length varies
2 elbows (15, 30, 45 degrees) if you are offsetting the pipe; no elbows if it's running straight
single to double connector
double wall pipe - length varies
roof support
trim plate
roof flashing (silicone flashings work for any roof pitch, otherwise the flashing has to be the right pitch for your roof)
rain cap
storm collar
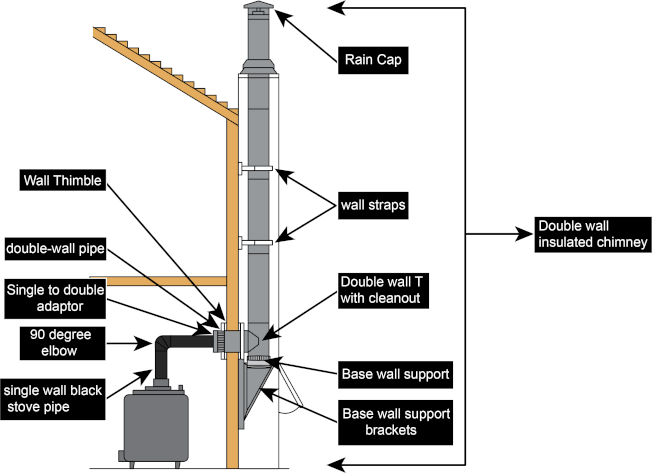
2) Connecting to the top of the stove but exiting through the wall:
single pipe going vertically - length varies
90 degree single elbow
single pipe going horizontally - length varies
single to double adaptor
short section of a double wall pipe to pass through the all thimble: 10"
wall thimble
double wall T-section with plug
wall support & wall support brackets
double wall pipe going vertically from the T-section - length varies
wall straps every 48" of the pipe
rain cap
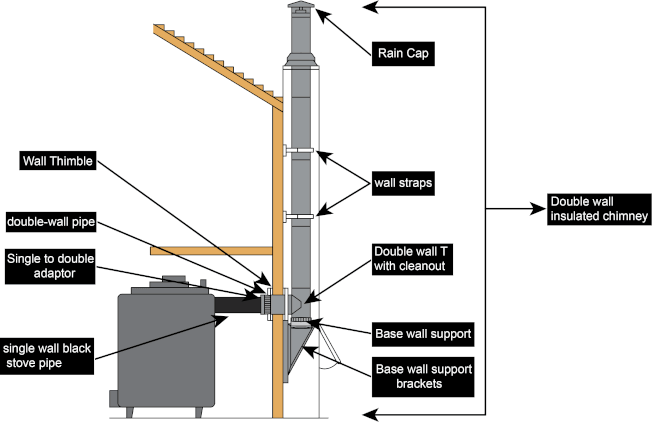
3) Going from the back of the stove through the wall. You can use this option on the stoves equipped with the rear flue collar (all of ours except the Apple Pies and the Salamander Range). You would also need to use this option with a stove that has a cook plate (except for the Apple Pies) and the cooktop is blocking the top flue collar.
single to double adaptor
short section of a double wall pipe to pass through the all thimble: 10"
wall thimble
double wall T-section with plug
wall support & wall support brackets
double wall pipe going vertically from the T-section - length varies
wall straps every 48" of the pipe
rain cap
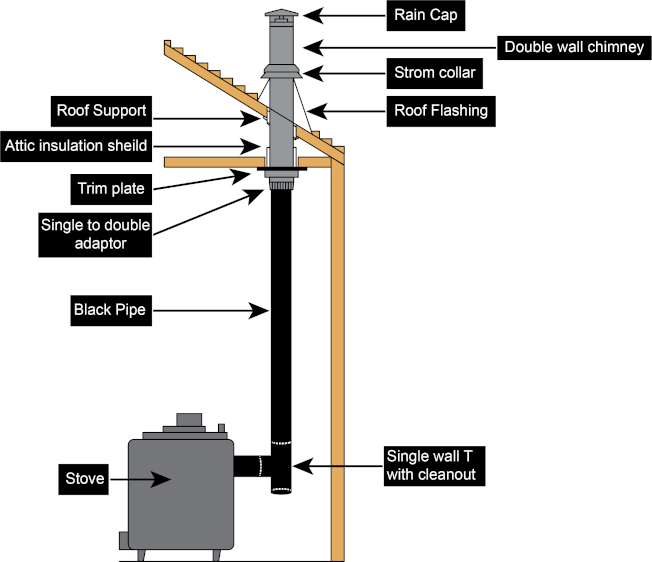
4) Going from the back of the stove straight up inside the room. This option is used in identical situations as #3 above but keeps more pipe inside the room which adds to heating, keeps the chimney warmer, and saves money.
single wall T-section with plug
single pipe - length varies
2 elbows (15, 30, 45 degrees) if you are offsetting the pipe; no elbows if it's running straight
single to double connector
double wall pipe - length varies
roof support
trim plate
roof flashing (silicone flashings work for any roof pitch, otherwise the flashing has to be the right pitch for your roof)
rain cap
storm collar
Please note that the Apple Pies and the Salamander Range allow only for top connections, they do not have flue connectors on the back. In the case of the Apple Pie if you are getting a cook plate or baking oven with it then the stove will be vented with the help of a vertical rear connector: it attaches to the top of the stove in the back but still vents vertically (see pictures on the Apple Pie page).
Good luck with your project!